ATL ServerISAPI DLLs provide the necessary interface to build web applications, but ISAPI is an extremely low-level way to work. It forces the developer to manage every detail of the web application, even if the requirement is just to slap a username on a "Hello, World" HTML page. ATL Server is a set of classes that simplify the development of ISAPI DLLs in the same style that the rest of ATL simplifies COM development: reasonable implementations of default functionality, and the capability to override those defaults efficiently when needed. Figure 13.5 presents a very high-level view of the typical ATL Server application architecture.
Figure 13.5. ATL Server architecture
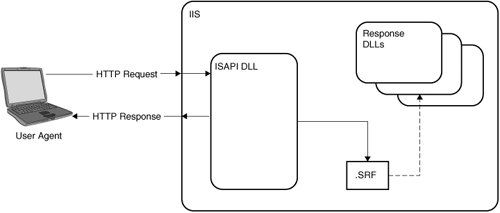
The ATL Server architecture divides your web application into three parts:
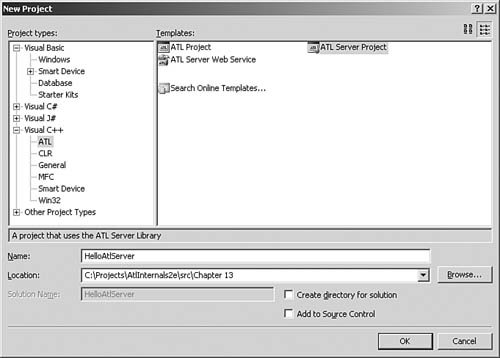
These three parts neatly divide up the details of implementing a web application. At the front of the stack is the ISAPI DLL. This is responsible for two things: interfacing with IIS (by implementing the ISAPI functions) and dispatching the incoming requests to the appropriate handler (more about handlers later). In most cases, your application needs to return HTML that is a combination of static and dynamic content. ATL Server provides a custom extension mapping, .SRF, to a Server Response File. These files contain static text that's sent directly to the client, along with substitution markers that are evaluated at runtime to generate the dynamic content. The Response DLLs contain the code that evaluates the substitution markers, and this is where your application logic typically resides. Another way to look at the architecture is this: The ISAPI DLL handles the plumbing. The SRF files are your presentation. The Response DLLs contain your business logic. Each of these concerns is separated so that you work on each individually as needed. Hello ATL ServerI next rebuilt the Hello ISAPI using ATL Server directly. The first step was to create a new ATL Server project (as shown in Figure 13.6).
Figure 13.6. Creating an ATL Server project
The first page of the wizard is the usual "Welcome to the wizard" stuff. The next page, Project Settings (see Figure 13.7), is where things get interesting. Figure 13.7. ATL Server Project Settings page

The Project Settings page lets you choose what the wizard generates. By default, you get two projects: an ISAPI extension DLL (much like the one I already wrote) and a web application DLL that contains the logic that drives the .srf file. This page also specifies what the virtual directory should be (and the wizard automatically creates and configures the virtual directory for us, saving a manual step). The next page, Server Options (see Figure 13.8), lets you turn on various ATL Server services that the ISAPI DLL provides. Figure 13.8. ATL Server project Server Options page
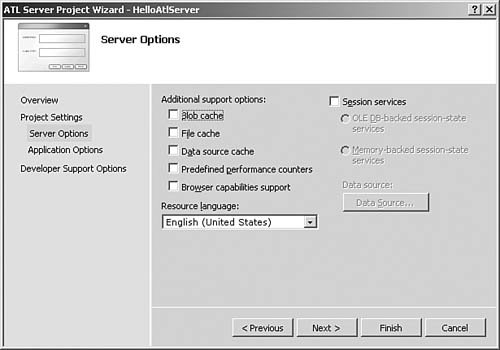
Each of the check boxes in the Server Options page corresponds to a service that ATL Server provides. One of the more important services is caching, and ATL Server provides several kinds of caches. The Blob Cache check box adds a service that lets you cache arbitrary chunks of memory (Binary Large OBjects) in memory in the web server. The File Cache check box adds a service that manages data that is stored in temporary files. The Data Source Cache check box adds a service that stores opened OLE DB connection objects. This way you can open the connection once and then just reuse it out of the cache, saving the cost of opening the connection on each request. Session state is something else that most web applications need but that HTTP doesn't support. Checking the Session Services check box lets you add one of the two session-state implementations in ATL Server. The OLE DB-Backed Session-State Services uses a database (accessed via OLE DB) to store the session information. If a database is undesirable, you can instead choose Memory-Backed Session-State Services, which stores the session state in memory on the web server. This is much faster to access, but because the data is stored in the web server, it's not accessible from other machines; more specifically, if you've got a web farm, in-memory session state will be a problem. The Predefined Performance Counters option causes the ISAPI DLL to automatically update Windows performance counters for the number of accesses, pages per second, and other such statistics. The Browser Capabilities Support option turns on ATL Server's support for identifying the client's browser, which lets you, for example, output inline JavaScript only to browsers that support it. I don't need any of the server options for this particular project, so I left everything unchecked. The next page, Application Options (see Figure 13.9), lets you specify options for the generated application DLL. Figure 13.9. ATL Server Application Options page
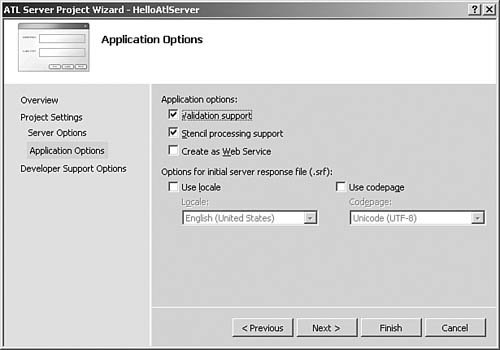
Validation Support adds a skeleton implementation of the ValidateAndExchange() method to the request-handler class. This method is called once before the .srf file is processed; this is the place to put input validation code. Stencil Processing Support provides a skeleton REPLACEMENT_MAP in the code and a sample replacement method. The stencil processor uses this map in the class declaration to find the proper method to execute when it hits a replacement token in the .srf file. Create as Web Service adds a web service handler to the project instead of a regular HTML request handler (we discuss this one later). The remaining two options affect the generated sample .srf file. The Use Locale and Use Codepage check boxes add a sample locale and codepage directive to the .srf file. In the sample app I'm writing, the defaults are appropriate. The final page, Developer Support (see Figure 13.10), gives a couple miscellaneous options that affect several files in the generated code. Figure 13.10. ATL Server Developer Support page
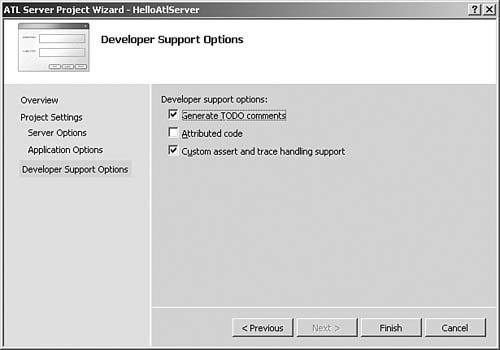
Generate TODO Comments tells the wizard to add TODO comments to the code to mark spots where you'll want to change things. Attributed Code tells the wizard to output code with ATL attributes. Custom Assert and Trace Handling Support adds extra code to the debug build of the project that allows trace messages to be output to the WinDbg debugger. Again, the defaults are fine for what I need for the sample. After clicking Finish and waiting for Visual Studio to crunch, I had a solution containing two projects. The first contained the code for the new ISAPI extension. This project was already configured with an appropriate .def file to export the ISAPI methods and set up for web deployment. The ISAPI DLL implementation was as follows:
// HelloAtlServerIsapi.cpp : Defines the entry point
// for the DLL application.


#include "stdafx.h"
// For custom assert and trace handling with WebDbg.exe
#ifdef _DEBUG
CDebugReportHook g_ReportHook;
#endif

class CHelloAtlServerModule
    : public CAtlDllModuleT<CHelloAtlServerModule> { };

CHelloAtlServerModule _AtlModule;

typedef CIsapiExtension<> ExtensionType;

// The ATL Server ISAPI extension
ExtensionType theExtension;


// Delegate ISAPI exports to theExtension

extern "C"
DWORD WINAPI HttpExtensionProc(LPEXTENSION_CONTROL_BLOCK lpECB) {
  return theExtension.HttpExtensionProc(lpECB);
}

extern "C"
BOOL WINAPI GetExtensionVersion(HSE_VERSION_INFO* pVer) {
  return theExtension.GetExtensionVersion(pVer);
}

extern "C"
BOOL WINAPI TerminateExtension(DWORD dwFlags) {
  return theExtension.TerminateExtension(dwFlags);
}

#ifdef _MANAGED
#pragma managed(push, off)
#endif

// DLL Entry Point

extern "C"
BOOL WINAPI DllMain(HINSTANCE hInstance,
  DWORD dwReason, LPVOID lpReserved) {
  hInstance;
  return _AtlModule.DllMain(dwReason, lpReserved);
}
#ifdef _MANAGED
#pragma managed(pop)
#endif
The ISAPI DLL provides the implementation of the three ISAPI exports, but the implementations here don't do any work. Instead, they forward the calls to a global instance of CIsapiExtension, which is the class that implements all the ISAPI plumbing. The #pragma managed(push, off) line is there in case you're using managed C++. The DllMain enTRy point must be in native code for Windows to properly call it at load time. The #pragma turns managed code off the DllMain function, and then the second #pragma managed(pop) turns managed code back on. The mixture of managed and native code is beyond the scope of this book, but it is nice to know that the ATL engineers considered it. For this particular project, I don't need to touch the ISAPI DLL. The interesting part is in the Application DLL project. This project contains two important things. The first is the HelloAtlServer.srf file: <html> {{// use MSDN's "ATL Server Response File Reference" to learn about SRF files.}} {{handler HelloAtlServer.dll/Default}} <head> </head> <body> This is a test: {{Hello}}<br> </body> </html> Much as ASP files are HTML with the addition of <% %> markers, .srf files are HTML with the addition of {{ }} markers that indicate that substitutions should be performed at that point. Two kinds of substitution markers exist: directives (such as the {{hander.. }} marker) that control the execution of the stencil engine, and substitution markers that indicate where text should be replaced. Additionally, comments are also available (the {{// }} form) and are handy for putting notes into your code that don't get sent back to clients in the HTML. To make this project's page match the output from my previous one, I edited the default .srf file to look like this instead: <html> {{handler HelloAtlServer.dll/Default}} <head> <title>Hello from ATL Server</title> </head> <body> <h1>Hello from ATL Server</h1> {{if NameGiven}} <p>Your name is {{Name}} {{else}} <p>You didn't give your name! {{endif}} </p> </body> </html> This .srf file uses both flow control (the if block) and substitution (the Name block). An .srf file is connected to request handler classes via the handler marker. In this file, the handler marker says that the request-handler class is in the Hello-AtlServer.dll file, and it's marked with the name Default. The HelloAtlServer.cpp file shows how the name Default is mapped to an actual C++ class:
// HelloAtlServer.cpp
...

BEGIN_HANDLER_MAP()
    HANDLER_ENTRY("Default", CHelloAtlServerHandler)
END_HANDLER_MAP()
The HANDLER_MAP() in an ATL Server project serves the same purpose as the OBJECT_MAP()in an ATL project;[4] it maps a key (in this case, the handler name) to a specific class.
The CHelloAtlServer class is where we actually put the substitutions. The default version output from the wizard looks like this:
// HelloAtlServer.h : Defines the ATL Server
// request handler class

#pragma once

class CHelloAtlServerHandler
  : public CRequestHandlerT<CHelloAtlServerHandler> {
public:
  BEGIN_REPLACEMENT_METHOD_MAP(CHelloAtlServerHandler)
    REPLACEMENT_METHOD_ENTRY("Hello", OnHello)
  END_REPLACEMENT_METHOD_MAP()

  HTTP_CODE ValidateAndExchange() {
    // TODO: Put all initialization and validation code here

    // Set the content-type
    m_HttpResponse.SetContentType("text/html");

    return HTTP_SUCCESS;
  }

protected:
  // Here is an example of how to use a replacement
  // tag with the stencil processor
  HTTP_CODE OnHello(void) {
    m_HttpResponse << "Hello World!";
    return HTTP_SUCCESS;
  }
};
The REPLACMENT_METHOD_MAP() macros give the mappings between the markers in the .srf file and the actual methods in the class that get called at substitution time. The class also includes the ValidateAndExchange() method. This method gets called once at the start of page processing, and this is the place where you can process and validate your inputs. To implement our "Hello, World" page, we need to first check to see if a name parameter was passed on the query string, pull out the name, and provide implementations for the NameGiven and Name substitutions:
class CHelloAtlServerHandler
  : public CRequestHandlerT<CHelloAtlServerHandler> {

public:
  BEGIN_REPLACEMENT_METHOD_MAP(CHelloAtlServerHandler)
    REPLACEMENT_METHOD_ENTRY("NameGiven", OnNameGiven)
    REPLACEMENT_METHOD_ENTRY("Name", OnName)
  END_REPLACEMENT_METHOD_MAP()

  HTTP_CODE ValidateAndExchange() {
    m_name = m_HttpRequest.GetQueryParams( ).Lookup( "name" );
    return HTTP_SUCCESS;
  }
protected:
  HTTP_CODE OnNameGiven( ) {
    if( m_name.IsEmpty( ) ) {
      return HTTP_S_FALSE;
    }
      return HTTP_SUCCESS;
  }

  HTTP_CODE OnName( ) {
    m_HttpResponse << m_name;
    return HTTP_SUCCESS;
  }

private:
  // Storage for the name in the query string
  CStringA m_name;
};
The m_name member stores the name retrieved from the query string. To retrieve it, I used the m_HttpRequest member provided by the CRequestHandlerT base class. This is an instance of the CHttpRequest class that has already been initialized by the time ValidateAndExchange is called. The OnName method is called when the {{Name}} substitution is hit in the .srf file. It uses the m_HttpResponse member from the base class, which is a ready-to-go instance of CHttpResponse. It simply writes the name to the output. All successful substitution methods must return HTTP_SUCCESS, or the processing will be aborted with an error. The OnNameGiven method is slightly different. This is used from the {{if ...}} block and is used to control which chunk of HTML is actually output from the .srf file. For a method that must return true or false, true is indicated by an HTTP_SUCCESS return code. HTTP_S_FALSE[5] indicates a false value. Any other return value aborts the processing. The HTTP code returned to the client depends on the actual return value. HTTP_FAIL is probably the most common; its returns an HTTP code 500 (Server Error).
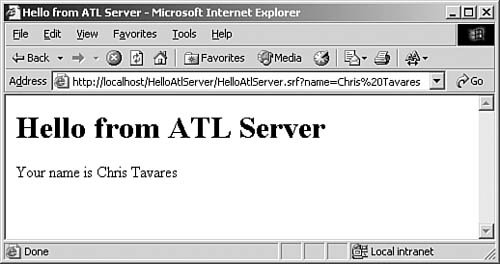
Because the wizard enables web deployment, compiling the project automatically deploys it as well. Pressing F5 causes Visual Studio to automatically attach to IIS, and brings up a browser showing the result of my .srf file processing[6] (see Figure 13.11). Tweaking the URL by adding ?name=Chris%20Tavares gave the result in Figure 13.12.
Figure 13.11. SRF processing, no name on query string
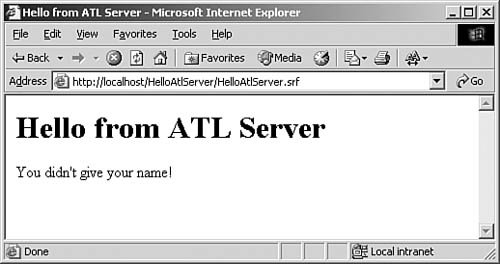
Figure 13.12. SRF processing with name on query string
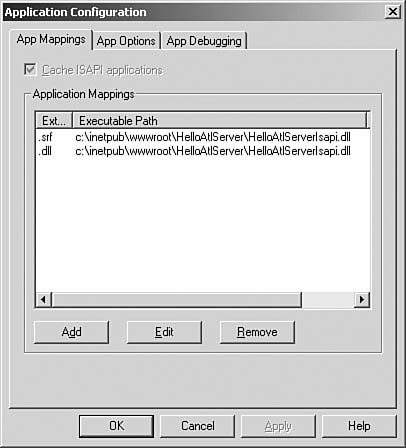
So, what does the wizard-generated ATL Server project buy us? First, it saves a lot of effort in configuring the project: setting up virtual directories, configuring web deployment, and setting up for debugging. Next, we get a clean separation between the ISAPI plumbing and the business logic. ATL Server provides a high-performance implementation of ISAPI applications out of the box, one that would take a great deal of effort to do correctly by hand. Finally, we get a good separation of presentation and logic. We no longer need to recompile just to tweak the HTML; all we need to do is change the .srf file and redeploy that file to the web server. ATL Server also gave me something that is rather subtle but very important. Consider the URL that was used. For the "by hand" project, the URL was this: http://localhost/HelloISAPI/HelloISAPI.dll For the ATL Server project, the URL was this: http://localhost/HelloAtlServer/HelloAtlServer.srf Notice that the first URL references the DLL directly, whereas the second one goes to the .srf file. The big deal here is simply this: In the home-grown version, if I want multiple web pages, I need to provide the logic to map URLs (or query strings) to particular pages myself. ATL Server, on the other hand, automatically uses the appropriate DLLs when you reference an .srf file. If you want a new page, just drop in a new .srf file. The ATL Server Project Wizard configured the .srf extension to map to the ISAPI DLL, as shown in Figure 13.13. Figure 13.13. IIS extension mappings for an ATL Server project
IIS automatically routes any request for an .srf file in this virtual directory to the ISAPI extension; at that point, ATL Server takes over and routes the request to the correct .srf file and request handlers. |
