Creating the Initial Control Using the ATL WizardSome people prefer to write all the code for a control by hand. They don't care for the wizard-generated code because they don't understand what it does. Occasionally, the wizard-generated code is incorrect as well. Even if you generate the initial code base using the wizard, you will change it greatly before the control is complete anyway, so you might as well save some time and effort initially by using the wizard. Selecting Options for the CBullsEye Implementation ClassUsing the requirements for the BullsEye control, I created an ATL project and used the Add Class dialog box to add an ATL control. First, I defined the name of my implementation class, (CBullsEye), its source filenames, the primary interface name (IBullsEye), and various COM object registration information (see Figure 11.5). Figure 11.5. BullsEye Names dialog box

The Options screen (see Figure 11.6) looks much like the Options page you get when adding a simple object. In addition to letting you choose the interface type and threading model, it lets you choose what type of control you want. Figure 11.6. COM object options for the BullsEye control

In this case, I chose Standard Control because it matches the BullsEye requirements the best of the three choices.[1] The Options page in this wizard is slightly different than the Simple Object Wizard's Options page. Controls need thread affinity (because they are UI components and use window handles, which are associated with a thread). Therefore, the wizard correctly allows you to request only the Single or Apartment threading models for a control.
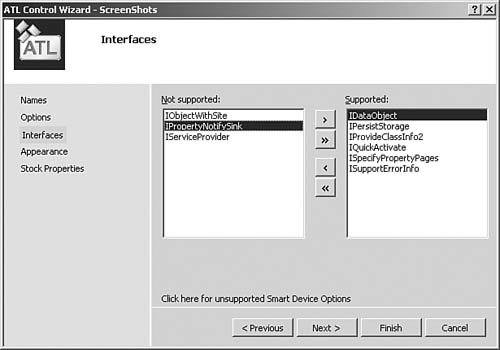
The Minimal Control check box[2] tells the wizard that you want to support only the minimum interfaces needed to be an ActiveX control. This means that when you get to the Interfaces page in the wizard (see Figure 11.7), the Supported list will be empty by default instead of the standard set you normally get.
Figure 11.7. Interfaces for the BullsEye control

Containers access a control's properties and methods using the control's IDispatch interface. The easiest way to get an IDispatch implementation in your control is to specify that the primary interface should be a dual interface. If you specify the Custom interface option, you must implement IDispatch separately on the control. Controls can be aggregated or not. I've requested that BullsEye support aggregation, even though it increases the size of each instance by 8 bytes. Next, we get to choose from a set of stock interfaces (see Figure 11.7). In addition to the standard list the wizard supplies, I added the IPropertyNotify-Sink interface, which is the standard interface for the control to tell its container that a property has changed. The Appearance page, shown in Figure 11.8, enables you to select various control options that are not available elsewhere. Figure 11.8. Miscellaneous control options for the BullsEye control

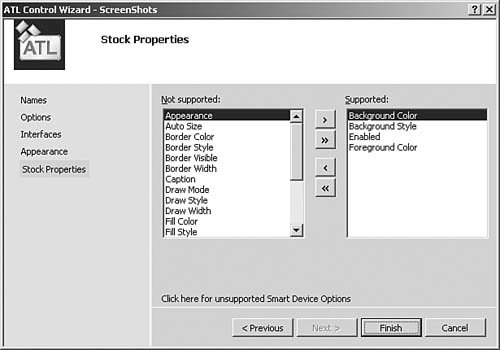
The options on the Appearance page specify various optimizations that ActiveX control containers can take advantage of. The Opaque option says that your control is completely opaque: None of the container's background will show through your control. Containers can use this to avoid having to paint the background under the control. Solid Background (which means anything only when Opaque is also specified) indicates that the background of your control is a solid color instead of a patterned brush. Later, I discuss how to implement the BullsEye rendering code so that it supports transparent areas around the bull's eye, but let's start with an opaque control. Your choices for these two options appear in the code as a DECLARE_VIEW_STATUS macro in your class declaration. This macro provides a method that returns the options you chose. The IViewObjectExImpl< > template uses this method to implement the IViewObjectEx interface. The Normalize DC (device context) option causes your control to override the OnDraw method for its rendering. When not selected, the control overrides the OnDrawAdvanced method. By default. OnDrawAdvanced saves the state of the device context, switches to MM_TEXT mapping mode, calls OnDraw, and then restores the saved device context. Therefore, when you ask for a normalized DC and don't override OnDrawAdvanced, you introduce a little more overhead. BullsEye uses this support, though. Windowed Only states that the control does not support windowless activation; the control must have its own window. This is useful for drop targets, for example, that need to receive window messages, but the BullsEye control can handle windowless activation. Insertable adds a Registry entry under the control's CLSID key that makes the control show up in the standard Insert Object dialog box used by OLE containers, as in the various Microsoft Office applications. Selecting this option also adds support for the IPersistStorage and IDataObject interfaces. The Add Control Based On option enables you to create an ActiveX control that superclasses one of the standard Windows controls: Button, ComboBox, Edit, and more. A total of 16 options are available here, but the typical ActiveX control generally will be a new window class, so None is the default. The Miscellaneous Status bits provide a couple extra pieces of information to the container: They result in Registry changes in the RGS file and the introduction of a DECLARE_OLEMISC_STATUS macro into your header file. Invisible at Runtime means that the control displays only at design time, not at runtime. The VB Timer control is the canonical example of this behavior. Acts Like Button controls can be set as the default OK or Cancel buttons on dialog boxes or on forms. Finally, Acts Like Label is used for a control that doesn't accept keyboard focus, but that can be an accelerator key to select the next control in the Tab order (surprisingly enough, this is exactly how a label behaves). Figure 11.8 shows the options chosen for the BullsEye control. Finally, you can have the wizard generate support for any stock properties that you want the control to support. BullsEye requires four stock properties, which I've selected in the dialog box in Figure 11.9. ATL provides the implementation of the property-accessor methods. Figure 11.9. Stock properties for the BullsEye control

No wizard support exists for stock methods, so you have to implement them, as well as the BullsEye custom properties, by hand. Base Classes Used by Wizard-Generated ClassesThe ATL wizard generates the initial source code for a control. The control class derives from a number of different base classes, depending on the type of control you ask the wizard to generate. The wizard also adds support for various features based on selections you make from the ATL Object Wizard Properties dialog pages. Table 11.5 summarizes the base classes used by the different types of wizard-generated controls. Table 11.5. Base Classes Used by Various Control Types
|
||||||||||||||||||||||||||||||||||||||||||||||||||||||||||||||||||||||||||||||||||||||||||||||||||||||||||||||||||||||||||||||||||||||||||||||||||||||||||||||||||||||||
