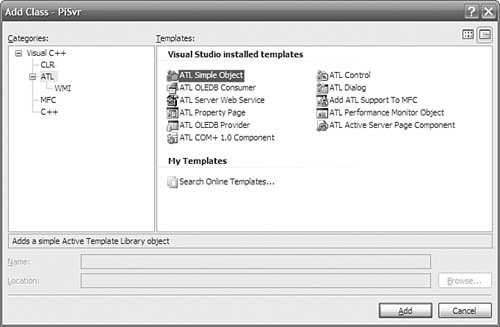
Inserting a COM ClassAdding an ATL Simple ObjectWhen you have an ATL COM server, you'll probably want to insert a new COM class. This is accomplished by selecting the Add Class item in the Project menu. When inserting an ATL class, you first have to choose the type of class you want, as shown in Figure 1.4. Figure 1.4. Adding an ATL COM class

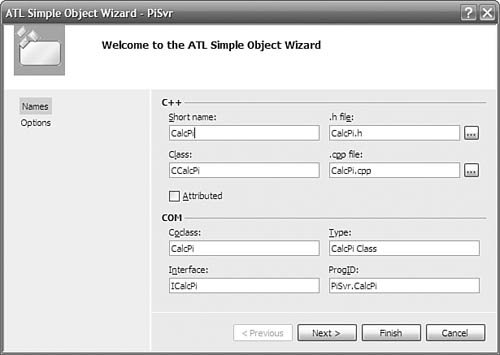
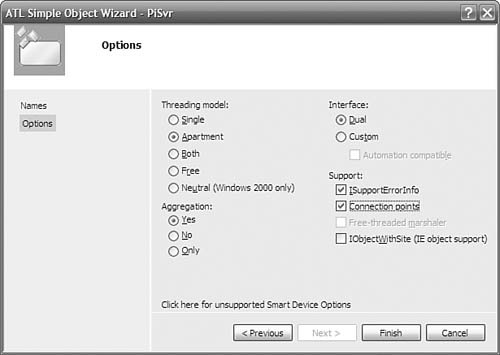
If you're following along, you might want to take a moment to explore the various types of classes available. Each of these classes results in a specific set of code being generated, using the ATL base classes to provide most of the functionality and then generating the skeleton for your own custom functionality. The wizard for a particular class type is your chance to decide which interfaces you want your COM class to implement. Unfortunately, the wizard doesn't provide access to all the functionality of ATL (or even most of it), but the generated code is designed to be easy for you to add or subtract functionality after it has gotten you started. Experimentation is the best way to get familiar with the various wizard-generated class types and their options. After you choose one of the class types (and press OK), Visual Studio generally asks for some specific information from you. Some of the classes have more options than the ATL Simple Object (as selected in Figure 1.4), but most of the COM classes require at least the information shown in Figures 1.5 and 1.6.[3]
Figure 1.5. Setting COM class names

Figure 1.6. Setting COM class attributes

The Names tab of the ATL Simple Object Wizard dialog box requires you to type in only the short name, such as CalcPi. This short name is used to compose the rest of the information in this dialog box (which you can override, if you choose). The information is divided into two categories. The necessary C++ information is the name of the C++ class and the names of the header and implementation files. The necessary COM information is the coclass name (for the Interface Definition Language [IDL]); the name of the default interface (also for the IDL); the friendly name, called the Type (for the IDL and the registration settings); and finally the version-independent programmatic identifier (for the registration settings). The versioned ProgID is just the version-independent ProgID with the ".1" suffix. Note that the Attributed option is not selected. In a nonattributed project, we have the option of selectively adding attributed classes to our project via the Attributed check box in Figure 1.5. The Options page is your chance to make some lower-level COM decisions. The Threading model setting describes the kind of apartment where you want instances of this new class to live: a single-threaded apartment (STA, also known as the Apartment model), or a multithreaded apartment (MTA, also known as the Free-Threaded model). The Single model is for the rare class that requires all its objects to share the application's main STA, regardless of the client's apartment type. The Both model is for objects that you want to live in the same apartment as their clients, to avoid the overhead of a proxy/stub pair. The Neutral threading model is available only on Windows 2000 (and later) and is useful for objects that can safely execute on the thread of the caller. Calls to components marked as Neutral often execute more quickly because a thread switch is not required, whereas a thread switch always occurs with cross-apartment calls between other types of apartments. The Threading model setting that you choose determines the value for the ThreadingModel named value placed in the Registry for your server; it determines just how thread safe you need your object's implementation of AddRef and Release to be. The Interface setting enables you to determine the kind of interface you want the class's default interface to be: Custom (it needs a custom proxy/stub and does not derive from IDispatch) or Dual (it uses the type library marshaler and derives from IDispatch). This setting determines how the IDL that defines your default interface is generated. Custom interfaces can further be qualified by selecting the Automation Compatible option. This option adorns the IDL interface definition with the [oleautomation] attribute, which restricts the variable types that your interface's methods can use to OLE Automation-compatible types. For instance, [oleautomation] interface methods must use the SAFEARRAY type instead of conventional C-style arrays. If you plan to use your ATL COM object from several different client environments, such as Visual Basic, it is a good idea to check this option. Moreover, accessing COM objects from code running in the Microsoft .NET framework is much simpler if [oleautomation] interfaces are used. Deploying your COM object might also be simpler with the use of [oleautomation] interfaces because these interfaces always use the universal marshaler to pass interface references across apartments. The type library marshaler always is present on a machine that supports COM, so you don't need to distribute a proxy/stub DLL with your component. The Aggregation setting enables you to determine whether you want your objects to be aggregatablethat is, whether to participate in aggregation as the controlled inner. This setting does not affect whether objects of your new class can use aggregation as the controlling outer. See Chapter 4, "Objects in ATL," for more details about being aggregated, and Chapter 6, "Interface Maps," about aggregating other objects. The Support ISupportErrorInfo setting directs the wizard to generate an implementation of ISupportErrorInfo. This is necessary if you want to throw COM exceptions. COM exceptions (also called COM Error Information objects) enable you to pass more detailed error information across languages and apartment boundaries than can be provided with an HRESULT alone. See Chapter 5, "COM Servers," for more information about raising and catching COM exceptions. The Support Connection Points setting directs the wizard to generate an implementation of IConnectionPoint, which allows your object to fire events into scripting environments such as those hosted by Internet Explorer. Controls also use connection points to fire events into control containers, as discussed in Chapter 9, "Connection Points." The Help information for the Free-Threaded Marshaler setting reads as follows: "Allows clients in the same interface to get a raw interface even if their threading model doesn't match." This description doesn't begin to describe how dangerous it is for you to choose it. Unfortunately, the Free Threaded Marshaler (FTM) is like an expensive car: If you have to ask, you can't afford it. See Chapter 6, "Interface Maps," for a description of the FTM before checking this box. The Support IObjectWithSite setting directs the wizard to generate an implementation of IObjectWithSite. Objects being hosted inside containers such as Internet Explorer use this interface. Containers use this interface to pass interface pointers to the objects they host so that these objects can directly communicate with their container. Results of the ATL Simple Object WizardAfter you specify the options, the Simple Object Wizard generates the skeleton files for you to start adding your implementation. For the class, there is a newly generated header file containing the class definition, a .cpp file for the implementation, and an .RGS file containing registration information.[4] In addition, the IDL file is updated to contain the new interface definition.
The generated class definition looks like this:
// CalcPi.h : Declaration of the CCalcPi

#pragma once
#include "resource.h"       // main symbols

#include "PiSvr.h"
#include "_ICalcPiEvents_CP.h"

// CCalcPi

class ATL_NO_VTABLE CCalcPi :
    public CComObjectRootEx<CComSingleThreadModel>,
    public CComCoClass<CCalcPi, &CLSID_CalcPi>,
    public ISupportErrorInfo,
    public IConnectionPointContainerImpl<CCalcPi>,
    public CProxy_ICalcPiEvents<CCalcPi>,
    public IDispatchImpl<ICalcPi, &IID_ICalcPi, &LIBID_PiSvrLib,
        /*wMajor =*/ 1, /*wMinor =*/ 0>
{
public:
    CCalcPi() { }
DECLARE_REGISTRY_RESOURCEID(IDR_CALCPI)

BEGIN_COM_MAP(CCalcPi)
    COM_INTERFACE_ENTRY(ICalcPi)
    COM_INTERFACE_ENTRY(IDispatch)
    COM_INTERFACE_ENTRY(ISupportErrorInfo)
    COM_INTERFACE_ENTRY(IConnectionPointContainer)
END_COM_MAP()

BEGIN_CONNECTION_POINT_MAP(CCalcPi)
    CONNECTION_POINT_ENTRY(__uuidof(_ICalcPiEvents))
END_CONNECTION_POINT_MAP()
// ISupportsErrorInfo
    STDMETHOD(InterfaceSupportsErrorInfo)(REFIID riid);

    DECLARE_PROTECT_FINAL_CONSTRUCT()

    HRESULT FinalConstruct() {
        return S_OK;
    }

    void FinalRelease() {
    }

public:

};

OBJECT_ENTRY_AUTO(__uuidof(CalcPi), CCalcPi)
The first thing to notice is the list of base classes. In this instance, ATL takes advantage of both templates and multiple inheritance. Each base class provides a separate piece of the common code needed for a COM object:
The other important thing to note here is the COM_MAP macros. This is an instance of an ATL map: a set of macros that generate code (typically to fill in a lookup table). The COM_MAP, in particular, is used to implement the QueryInterface method that all COM objects are required to support. For more information about the base classes that ATL uses to implement basic COM functionality and how you can leverage this implementation for building object hierarchies and properly synchronizing multithreaded objects, see Chapter 4, "Objects in ATL." For more information about how to make full use of the COM_MAP, see Chapter 6, "Interface Maps." |