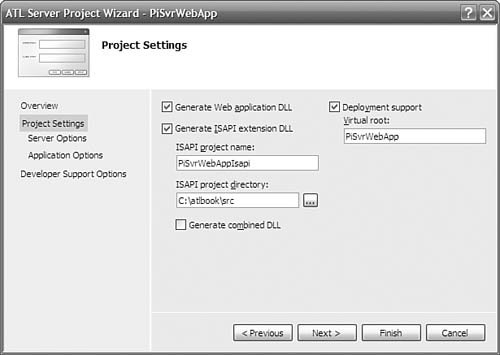
ATL Server Web ProjectsWithout a doubt, the most dramatic recent addition to the ATL library is a suite of classes and tools collectively termed ATL Server. ATL Server accounts for nearly all of the fourfold increase in the overall size of ATL from ATL 3. This extensive class library provides comprehensive support for building web applications and XML web services. Although traditional ASP and the ASP.NET platform offer compelling and easy-to-use frameworks for web-based development, many application developers must still resort to raw ISAPI programming for applications that demand low-level control and maximum performance. ATL Server is designed to provide the performance and control of ISAPI with the feel and productivity of ASP. To that end, ATL Server follows the design model that has made conventional ATL development so effective over the years: namely small, fast, flexible code. VS provides excellent wizard support for building web applications and web services. Walking through the numerous options available for ATL Server projects is actually quite insightful in understanding both the architecture and the sheer scope of the support provided. VS provides a wizard to help you get started building a web application with ATL Server. You launch this wizard by selecting the ATL Server Project option from the Visual C++ folder of the New Project dialog box. The Project Settings tab shown in Figure 1.21 displays the selected options for generating and deploying the DLLs that comprise our web application. Figure 1.21. Project settings for ATL Server project
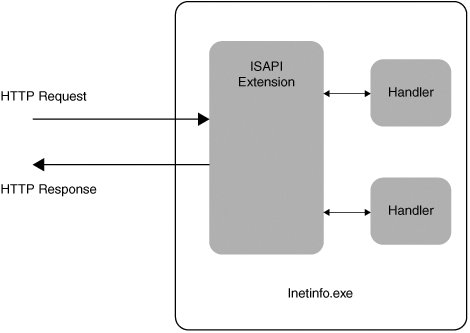
By default, ATL Server generates two projects in your solution: a web application DLL and an ISAPI extension DLL. ISAPI extension DLLs are loaded into the IIS process (inetinfo.exe) and logically sit between IIS and your web application DLL. Although ISAPI extensions can handle HTTP requests themselves, it is more common for them to provide generic infrastructure services such as thread pooling and caching, leaving web application DLLs to provide the real HTTP response logic. The ATL Server Project Wizard generates an ISAPI extension implementation that communicates with special functions in your web application called handlers. Figure 1.22 depicts this arrangement.
Figure 1.22. Basic ISAPI architecture
The Generate Combined DLL check box enables you to combine everything into a single DLL. This might be an appropriate option if the ISAPI extension is not intended to be used in other web applications. Conversely, developers can opt to leverage ATL Server's extensibility features by creating specialized ISAPI extensions with such options as custom thread pooling, highly tuned caching schemes, or optimized state management. These ISAPI extensions would then likely be reused across multiple web applications. Furthermore, keeping the ISAPI extension as a separate DLL gives us the flexibility to add handlers to our web application without restarting the web server (handler classes are discussed shortly). We'll leave the box unchecked for our first web application and allow VS to generate separate projects. The Deployment Support check box enables the VS web-deployment tool. With this option selected, the Visual Studio build process automatically performs additional steps for properly deploying your web application so that it is served by IIS. You'll see in a moment how convenient these integrated deployment features can be. A brief word of caution at this point is in order, however. The default setting to enable deployment support causes VS to deploy the built project files in a subdirectory of your default web site, typically <drive>:\inetpub\wwwroot. In a real-world development scenario, it might be more desirable to deploy in a different directory on the machine (such as the project directory). Several steps are required to accomplish this, so for now, we're sticking with the default setting just so that we can focus on developing our application. The Server Options tab shown in Figure 1.23 enables you to select various performance-oriented options for your web application. Several types of caching are supported, including support for arbitrary binary data (Blob cache), file caching, and database connection caching (Data source cache). Additionally, high-availability sites rely upon robust session-state management. ATL Server provides two mechanisms for persisting session state. The OLE DB-backed session-state services radio button includes support for persisting session state in a database (or other OLE DB data source), which is an option suited to applications running on web farms. Figure 1.23. Server Options tab for ATL Server project
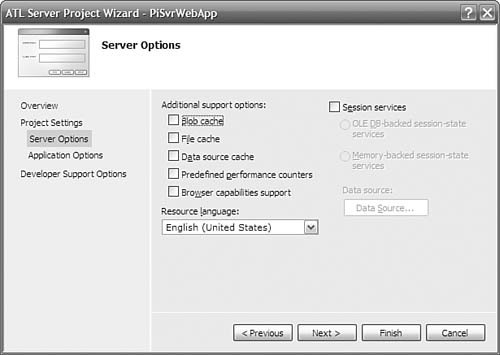
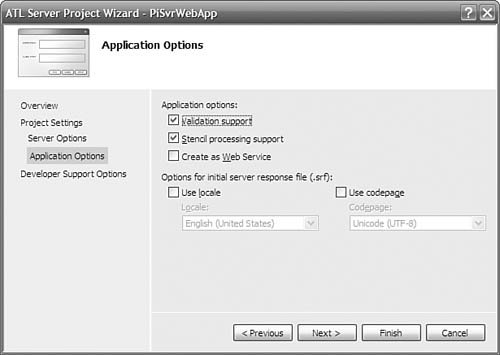
Figure 1.24 shows the selections available under the Application Options tab. Validation Support generates the necessary code for validating items in the HTTP request from the client, such as query parameters and form variables. Stencil Processing Support generates skeleton code for using HTML code templates known as server response files (SRF). These text files (also known as stencils) end with an .srf extension and intermix static HTML content with special replacement tags that your code processes to generate dynamic content at runtime. With stencil processing enabled, the wizard also allows you to select the locale and codepage for properly localizing responses. This simply inserts locale and codepage tags into the generated SRF file. (More on using SRF files comes shortly.) The Create as Web Service option also is discussed further in the following section. Because we're developing a web application, we leave this box unchecked for now.
Figure 1.24. ATL Server Application Options tab
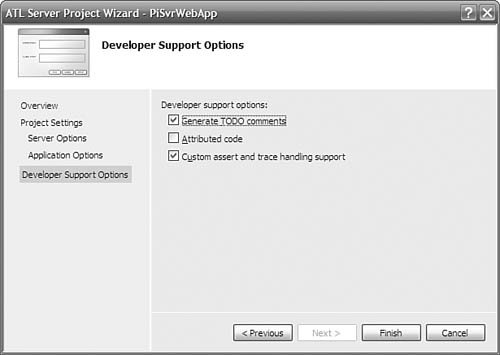
The remaining set of options for your ATL Server project appears under the Developer Support Options tab, shown in Figure 1.25. Generating TODO comments simply helps alert the developer to regions of code where additional implementation should be provided. If you select Custom Assert and Trace Handling Support, debug builds of your project will include an instance of the CDebugReportHook class, which can greatly simplify the process of debugging your web applicationeven from a remote machine. Figure 1.25. ATL Server Developer Support Options tab
Pressing Finish causes the wizard to generate a solution that contains two projects: one for your web application DLL (with a name matching the <projectname> entered in the New Project dialog box) and one for your ISAPI extension (with a name <projectname>Isapi). Let's take a look at the code generated in the ISAPI extension project. The generated .cpp file for our ISAPI extension looks like the following:
class CPiSvrWebAppModule :
public CAtlDllModuleT<CPiSvrWebAppModule> {
public:
};

CPiSvrWebAppModule _AtlModule;

typedef CIsapiExtension<> ExtensionType;

// The ATL Server ISAPI extension
ExtensionType theExtension;

// Delegate ISAPI exports to theExtension
//
extern "C"
DWORD WINAPI HttpExtensionProc(LPEXTENSION_CONTROL_BLOCK lpECB) {
    return theExtension.HttpExtensionProc(lpECB);
}

extern "C"
BOOL WINAPI GetExtensionVersion(HSE_VERSION_INFO* pVer) {
    return theExtension.GetExtensionVersion(pVer);
}

extern "C" BOOL WINAPI TerminateExtension(DWORD dwFlags) {
    return theExtension.TerminateExtension(dwFlags);
}

// DLL Entry Point
//
extern "C"
BOOL WINAPI DllMain(HINSTANCE hInstance, DWORD dwReason,
    LPVOID lpReserved) {
    hInstance;
    return _AtlModule.DllMain(dwReason, lpReserved);
}
Because the ISAPI extension uses the services of ATL for object creation, it needs an ATL Module object. Also included in the generated code are implementations of the three well-known entry points IIS uses to communicate HTTP request information to the ISAPI extension: HttpExtensionProc, GetExtensionVersion, and TerminateExtension. These implementations simply delegate to a global instance of CIsapiExtension, whose definition is given here: template < class ThreadPoolClass=CThreadPool<CIsapiWorker>, class CRequestStatClass=CNoRequestStats, class HttpUserErrorTextProvider=CDefaultErrorProvider, class WorkerThreadTraits=DefaultThreadTraits, class CPageCacheStats=CNoStatClass, class CStencilCacheStats=CNoStatClass > class CIsapiExtension : public IServiceProvider, public IIsapiExtension, public IRequestStats {... } This class provides boilerplate functionality for implementing the ISAPI extension. The template parameters to this class provide pluggable implementation for things such as threadpool management, error reporting, and caching statistics. By replacing this class in the .cpp file with your own CIsapiExtension-derived class and providing your own classes as template parameters, you can highly customize the behavior of your ISAPI extension. Techniques for doing this are presented in Chapter 13, "Hello, ATL Server." The default implementation of the ISAPI extension is suitable for our demonstration purposes here. Most of the action takes place in the web application project. The wizard generated a skeleton SRF file for us and placed it in the project. The HTML editor integrated into VS provides a convenient means of viewing and manipulating the contents of this file.
<html>
{{ handler PiSvrWebApp.dll/Default }}
    <head>
    </head>
    <body>
        This is a test: {{Hello}}<br>
    </body>
</html>
Items that appear within double braces indicate commands that are passed to the stencil processor. The {{handler}} command specifies the name of the DLL that houses our handler classes for processing replacement tags that appear in the SRF file. The /Default specifier identifies the default request-handler class to use for processing replacement tags. In general, an application DLL can contain multiple handler classes for processing SRF commands, and these classes can even exist in multiple DLLs. We use only a single handler class in a single application DLL, so all commands destined for handler classes will be routed to the same handler class. In the earlier wizard-generated skeleton, the {{Hello}} tag will be passed on to a handler class and replaced by the HTML produced from that class's replacement method. ATL Server uses several macros to map commands in the SRF file to handler classes in our application DLL. The class definition generated for us in the <projectname>.h file shows how these macros are used:
class CPiSvrWebAppHandler
    : public CRequestHandlerT<CPiSvrWebAppHandler>
{
public:
    BEGIN_REPLACEMENT_METHOD_MAP(CPiSvrWebAppHandler)
        REPLACEMENT_METHOD_ENTRY("Hello", OnHello)
    END_REPLACEMENT_METHOD_MAP()

    HTTP_CODE ValidateAndExchange() {
        // Set the content-type
        m_HttpResponse.SetContentType("text/html");
        return HTTP_SUCCESS;
    }

protected:
    HTTP_CODE OnHello(void) {
        m_HttpResponse << "Hello World!";
        return HTTP_SUCCESS;
    }
};
The CRequestHandlerT base class provides the implementation for a request-handler class. It uses the REPLACEMENT_METHOD_MAP to map the strings in replacements in the SRF file to the appropriate functions in the class. In addition to the request-handler class itself, in the handler DLL's .cpp file, you'll find this additional global map:
BEGIN_HANDLER_MAP()
    HANDLER_ENTRY("Default", CPiSvrWebAppHandler)
END_HANDLER_MAP()
The HANDLER_MAP is used to determine which class to use to process substitutions given with a particular name. In this case, the string "Default" as used in the handler tag in the SRF file is mapped to the CPiSvrWebAppHandler class. When the {{Hello}} tag is encountered in the SRF file, the OnHello method is invoked (via the REPLACEMENT_METHOD_MAP). It uses an instance of CHttpResponse declared as a member variable of the CRequestHandlerT to generate replacement text for the tag. Let's modify the wizard-generated code to display pi to the number of digits specified in the query string of the HTTP request. First, we modify the SRF file to the following:
<html>
{{ handler PiSvrWebApp.dll/Default }}
    <head>
    </head>
    <body>
        PI = {{Pi}}<br>
    </body>
</html>
We then add a replacement method called OnPi to our existing handler class and apply the [tag_name] attribute to associate this method with the {{Pi}} replacement tag. In the implementation of the OnPi method, we retrieve the number of digits requested from the query string. The CHttpRequest class stored in m_HttpRequest member variable exposes an instance of CHttpRequestParams. This class provides a simple Lookup method to retrieve individual query parameters from the query string as name-value pairs, so processing requests such as the following is a simple matter: http://localhost/PiSvrWebApp/PiSvrWebApp.srf?digits=6 The OnPi method implementation to field such requests follows:
class CPiSvrWebAppHandler {
...
    HTTP_CODE OnPi(void) {
        LPCSTR pszDigits = m_HttpRequest.m_QueryParams.Lookup("digits");
        long nDigits = 0;
        if (pszDigits)
            nDigits = atoi(pszDigits);
        BSTR bstrPi = NULL;
        CalcPi(nDigits, &bstrPi);

        m_HttpResponse << CW2A(bstrPi);
        return HTTP_SUCCESS;
    }
...
};
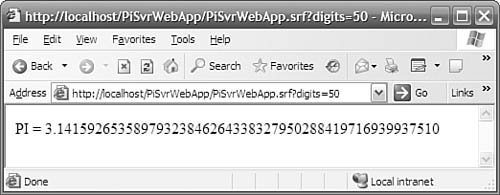
When we build our solution, VS performs a number of convenient tasks on our behalf. Because this is a web application, simply compiling the code into DLLs doesn't quite do the trick. The application must be properly deployed on our web server and registered with IIS. This involves creating a virtual directory, specifying an appropriate level of process isolation, and mapping the .srf file extension to our ISAPI extension DLL. Recall that when we created the project, we chose to include deployment support on the Project Settings tab of the ATL Server Project Wizard, shown previously in Figure 1.25. As a result, VS invokes the VCDeploy.exe utility to automatically perform all the necessary web-deployment steps for us. Simply compiling our solution in the normal manner places our application DLL, our ISAPI extension DLL, and our SRF file in a directory under our default web site, typically ending up in the directory <drive>:\inetpub\wwwroot\<projectName>. VS uses our web application project name as the virtual directory name, so browsing to http://localhost/PiSvrWebApp/PiSvrWebApp.srf?digits=50 produces the result in Figure 1.26. Figure 1.26. Web application for displaying pi to 50 digits
For more information about building ISAPI applications, including web services, with ATL Server, see Chapter 13, "Hello, ATL Server." |
